Many WooCommerce store owners face the same challenge. They love running their own online stores but find it hard to match the fast, reliable shipping that Amazon customers now expect.
That’s where Amazon Multi-Channel Fulfillment (MCF) comes in. It allows you to use Amazon’s fulfillment centers to ship orders from your WooCommerce store. This gives you Prime-like delivery speeds while still keeping control of your customer relationships and brand.
I’ve researched and tested the best ways to connect Amazon FBA with WooCommerce. In this guide, I’ll show you the most reliable setup, enabling you to offer faster shipping without giving up control of your business.
Why Connect Amazon FBA (MCF) to Your WooCommerce Store?
Connecting Amazon FBA (MCF) to your WooCommerce store allows you to offer fast, reliable shipping to your customers while automating your fulfillment process. This lets you match the delivery speeds of major retailers like Amazon without giving up control of your brand.
Here are more reasons why you should connect Amazon FBA to your WooCommerce store:
- Less time spent on fulfillment: You don’t have to pack boxes, print labels, or visit the post office. Amazon takes care of everything for you.
- Happier customers: Quick shipping and reliable service can lead to better reviews and more repeat customers.
- More time to grow your business: When Amazon handles shipping, you can focus on other things, like improving your products or working on marketing.
- You stay in control: Even though Amazon handles the delivery, the customer still buys from your WooCommerce site. You keep full control over the brand, pricing, and customer relationship.
If you’ve been wondering how to offer faster shipping without sacrificing control over your store, this setup might be just what you need.
Let’s go step by step and see how you can connect Amazon MCF to your WooCommerce store:
- 🛠️ Step 1: Set Up Your Amazon MCF Account
- 📄 Step 2: Create an FBA Product Listing for Your WooCommerce Products
- 📦 Step 3: Send Your Inventory to Amazon Using “Send to Amazon”
- 🔧 Step 4: Connect WooCommerce to Amazon FBA Using a Plugin
- 🛒 Step 5: Enable Amazon FBA for Each WooCommerce Product
- 🎁 Bonus: Improve Customer Satisfaction with Shipping Discounts
- Frequently Asked Questions About Amazon FBA
Note: You will need to set up your WooCommerce store before starting this tutorial. If you don’t have one yet, then please see our complete WooCommerce guide for beginners.
🛠️ Step 1: Set Up Your Amazon MCF Account
Before you can connect Amazon to your WooCommerce store, you need to make sure your Amazon FBA account is properly set up.
First, you’ll need to have a Professional Seller account on Amazon. If you don’t already have one, head over to sellercentral.amazon.com to sign up.
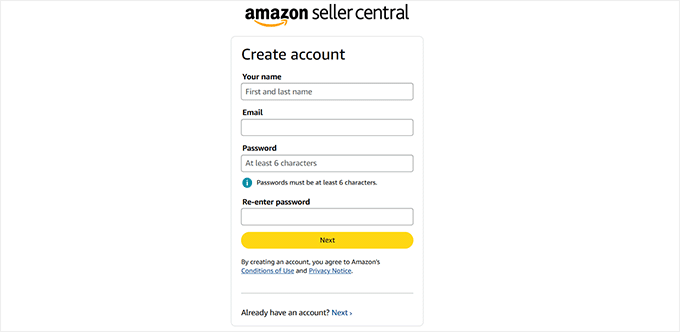
🚨Important: You must sign up for a Professional Seller account. The Individual plan does not support the necessary tools for this integration.
Once you enter your email address and create a password, Amazon will send you a verification code. This is just to make sure your email is valid.
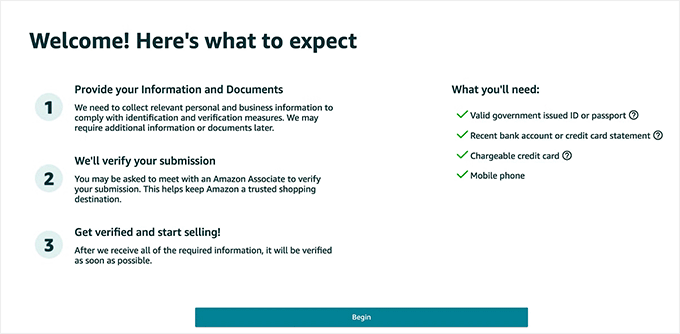
After you enter the correct code, Amazon will take you to the next screen and outline the steps needed to complete your account setup.
Make sure you have the following documents ready:
- A valid government-issued ID (like a passport or driver’s license)
- A recent bank account or credit card statement
- A chargeable credit card
- Your mobile phone
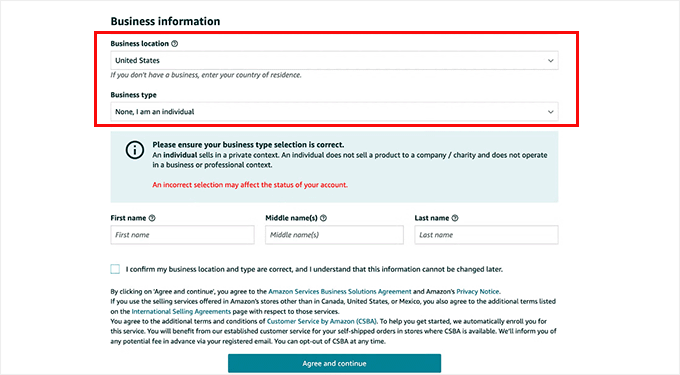
Amazon will then ask for your business location and business type.
Be sure to select the country where your business is located because Amazon will verify it later.
For business type, you can choose from several options such as State-owned business, Publicly-owned business, Privately-owned business, Charity, or ‘None, I am an individual.’
If you haven’t officially registered your business yet, just select the last option. You’ll also need to enter your full name and click ‘Agree and continue.’
In the next step, you need to give your personal information, including a form of identification (either your passport number or driver’s license number).
After that, you’ll be asked to verify your mobile phone number by entering a PIN code that Amazon sends via text or call.
Once you enter the code correctly, your phone number will be verified. When everything looks good, click ‘Next’ to continue.
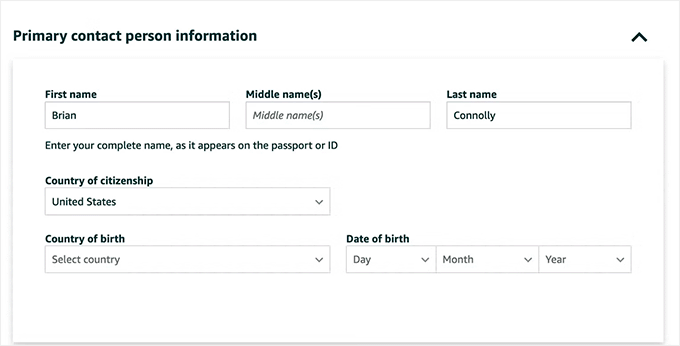
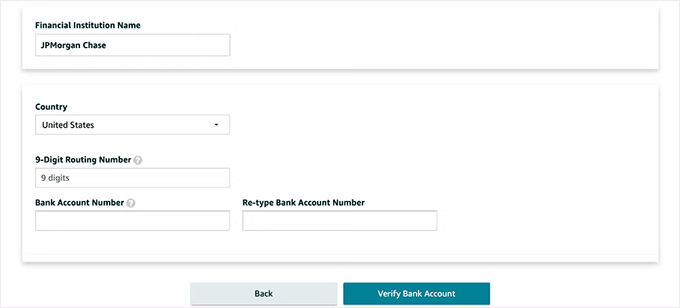
Now you’ll be asked for your billing information. This includes a valid credit card and bank account number.
Amazon needs this to charge your monthly fees and deposit your earnings from sales.
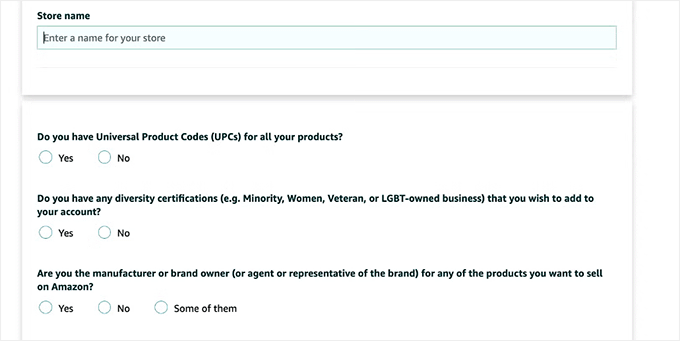
Once your billing info is verified, you’ll move on to a few questions about your products and your Amazon store. Don’t worry — you don’t need to overthink this part.
You’ll be asked to enter a name for your Amazon store (you can change it later), and answer a few product-related questions, like:
- Do you have UPC codes for your products?
- Do you have any diversity certifications?
- Are you the manufacturer or brand owner?
- Do you have a government-registered trademark?
Answer these based on your situation, and click ‘Next.’
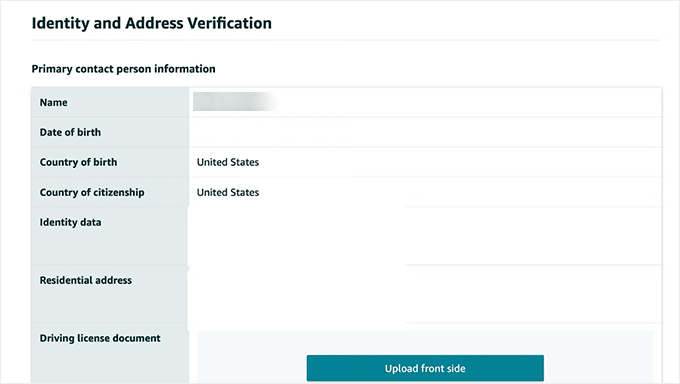
At this point, you’ll need to upload your ID (like a passport or license) and a bank statement to verify your identity. Once submitted, Amazon will ask you to complete a video call with one of its associates.
This required video call helps Amazon verify your identity by matching your face to the documents you submitted.
After the video call and final review, your account will be approved, and you’ll be able to log in to your Amazon Seller Central dashboard.
📄 Step 2: Create an FBA Product Listing for Your WooCommerce Products
Now that your Amazon Seller account is ready, it’s time to set up the actual product listings that Amazon will fulfill.
For every product you want Amazon to ship, you’ll need to create a matching product listing in your Amazon Seller Central account.
To do this, log in to the Seller Central dashboard and head over to the Catalogue » Add Product page.
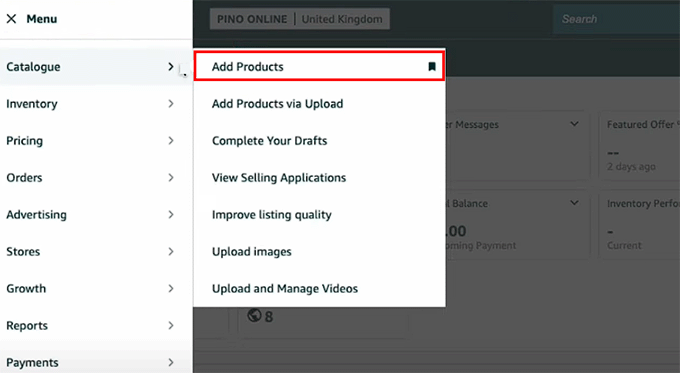
If your product already exists on Amazon, you can match it.
But if it’s unique to your online store, you’ll need to create a new listing by entering all the details manually.
💡Quick Tip: It’s usually best to create a new listing for your brand. This gives you full control over the product title, images, and description. If you match an existing listing, you’ll be selling on a product page that someone else controls.
Then, click the ‘Sell this product’ button.
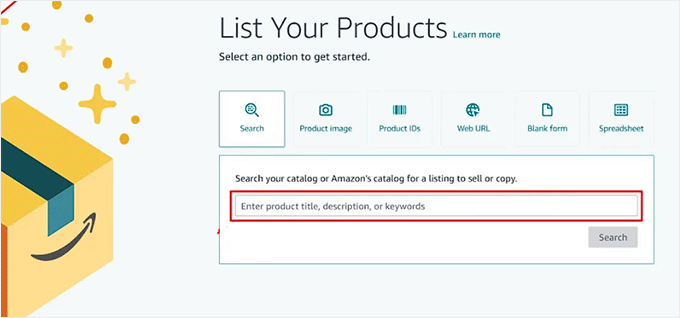
This will direct you to a new screen where you’ll just need to enter basic details like quantity, price, and fulfillment channel.
💡Just one quick note: Amazon assigns each product a Seller SKU, which you’ll need later to match with your WooCommerce product. I recommend copying these into a spreadsheet so that you can easily access them later.
Think of the SKU as a product’s secret code — WooCommerce and Amazon must use the exact same code so the plugin knows which item to ship.
For example, if your product’s SKU is TSHIRT-BLUE-LG in WooCommerce, you must enter TSHIRT-BLUE-LG as the Seller SKU in your Amazon listing for the connection to work.
For FBA, be sure to choose ‘Amazon will ship and provide customer service for this product.’ This tells Amazon to handle the product using FBA instead of making you ship it yourself.
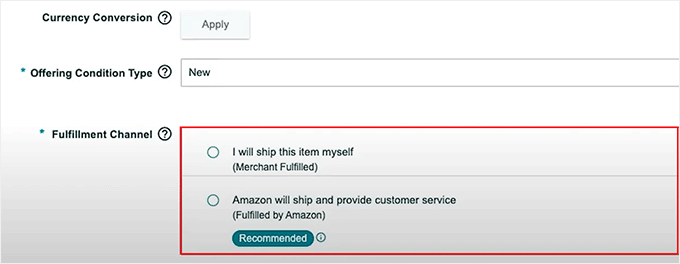
Once the listing is complete, save it and repeat the process for other products on your website.
You’ll now be able to send that product’s inventory to Amazon and make it eligible for both FBA and Multi-Channel Fulfillment (MCF) — which means Amazon can ship it when an order comes from your WooCommerce store.
📦 Step 3: Send Your Inventory to Amazon Using “Send to Amazon”
Once your product is listed in Amazon Seller Central and marked for FBA, the next step is to send your inventory to Amazon’s warehouse.
This is how your WooCommerce product becomes eligible for multi-channel fulfillment.
To do this, you’ll use Amazon’s Send to Amazon shipment workflow, which replaces the old shipping process with a more streamlined system.
Amazon will inform you which fulfillment center(s) to ship to and may request that you split your shipment across multiple locations to help distribute inventory throughout their network.
Start by going to your Manage All Inventory page in Seller Central.
Here, find the product you want to ship and click the ‘Edit’ dropdown next to it. Then, select the ‘Send/Replenish Inventory’ option.
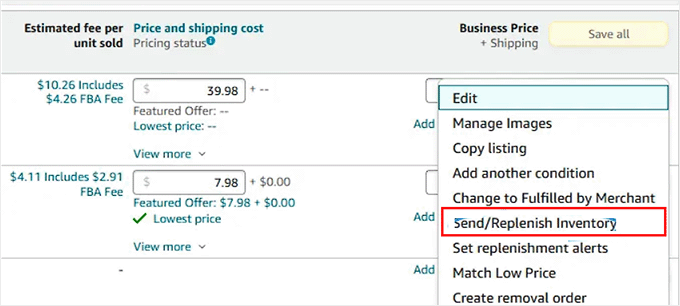
This will open the Send to Amazon setup, where the platform will ask for your packing details.
You’ll need to enter the number of units you’re placing in each box, the box dimensions and weight, and whether Amazon or you will apply the product labels.
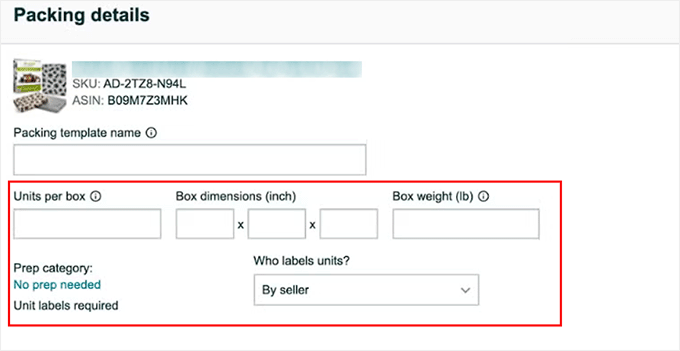
You can save this as a template if you plan to use the same box setup again later.
Once that’s done, enter the number of units you want to send, then click ‘Ready to Send’ followed by ‘Confirm and Continue.’

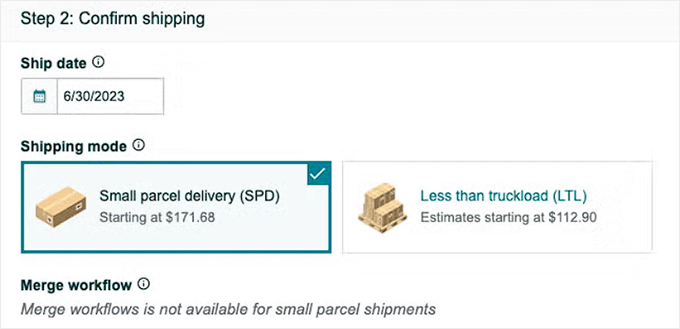
Next, you’ll choose your shipping method. Most WooCommerce sellers use Small Parcel Delivery (SPD) for individual boxes, especially if you’re using Amazon’s partnered carrier, like UPS.
You can also go with Less Than Truckload (LTL) if you’re shipping pallets. Amazon will show you rate options for each.
After choosing your ship date and carrier, click the ‘Accept charges and confirm shipping’ button.
Now it’s time to print your shipping labels and add them to the boxes you plan to ship. You can then drop off the boxes at UPS or schedule a pickup.
Once your inventory is live, you’re ready to connect your WooCommerce store to Amazon FBA.
🔧 Step 4: Connect WooCommerce to Amazon FBA Using a Plugin
Now that your inventory is active in Amazon FBA, you can connect your WooCommerce store to Amazon using the Amazon Fulfillment for WooCommerce plugin.
This tool allows orders from your WooCommerce store to be automatically fulfilled by Amazon without you having to manually ship anything.
Set Up the Amazon Fulfillment for WooCommerce Plugin
First, you need to install and activate the Amazon Fulfillment for WooCommerce plugin. For step-by-step instructions, see our tutorial on how to install a WordPress plugin.
🚨Note: Amazon Fulfillment for WooCommerce is a premium plugin and doesn’t have a free version. However, out of all the tools that I have tested, it offers the most straightforward way to connect Amazon FBA to WooCommerce.
Connect to Your Amazon Seller Account
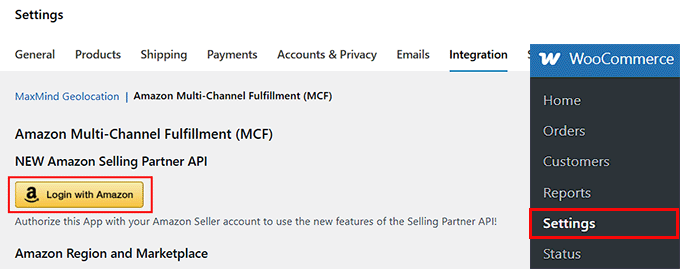
Upon activation, visit the WooCommerce » Settings » Integration » Fulfillment by Amazon page from your WordPress dashboard to start the setup process.
Here, you’ll first need to click the ‘Login With Amazon’ button. This will direct you to a new screen where you have to add your Amazon Seller account credentials.
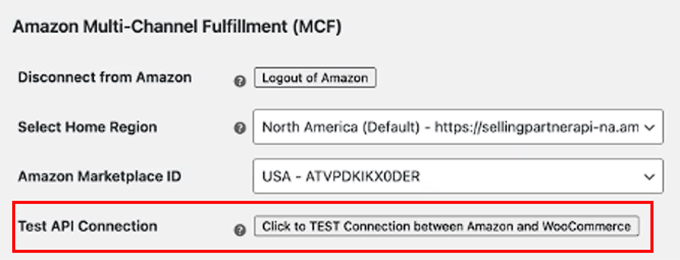
After logging in, you’ll return to the plugin settings, and your ‘Home Region’ and ‘Marketplace ID’ will be filled in automatically.
Now, you have to click the ‘Click to TEST Connection between Amazon and WooCommerce’ button. This confirms that your website is linked to Amazon through the Selling Partner API.
An API (Application Programming Interface) is like a secure bridge that lets your WooCommerce store and Amazon talk to each other automatically.
Import Your Amazon Products into WooCommerce
Once that is done, scroll down to the ‘Compare and Import Products from Amazon’ section and click the ‘Compare & Import your Products into WooCommerce by SKU’ button.
This pulls product data directly from your Amazon catalog and matches it with your WooCommerce products based on SKU.
💡Bonus Tip: The SKUs in your WooCommerce store must match the ones in your Amazon inventory. Otherwise, the plugin won’t know which product to sync.

After that, go to the ‘Inventory (Stock Level) Settings’ section. Here, you can click the ‘Click to Sync WooCommerce Stock Levels to match Amazon’ button to update your inventory manually.
To make sure everything is syncing correctly, use the ‘TEST Inventory Connection’ tool.
The plugin’s documentation may give a sample SKU (like OBRAMAIN) for testing, but I recommend using a real SKU from one of your own products. This will give you the most accurate test results.
If it works, your connection is good to go.

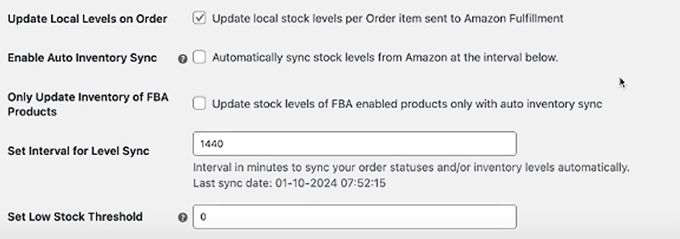
Below that, I recommend enabling the ‘Update local stock levels per Order item sent to Amazon Fulfillment’ setting. This will make sure your WooCommerce inventory automatically updates whenever a customer places an order.
You should also check the ‘Automatically sync stock levels from Amazon at the interval below’ box to enable automatic inventory syncing.
By default, the plugin syncs every 1440 minutes (once a day), but you can adjust this based on how often your stock changes.
There’s also an option to limit syncing to FBA-enabled products only, which can be helpful if you sell a mix of products fulfilled by Amazon and others that you ship yourself.
You can even set a low stock threshold so you get notified when items are running out. This helps prevent overselling and keeps your store running smoothly.
Customize Order Fulfillment Settings
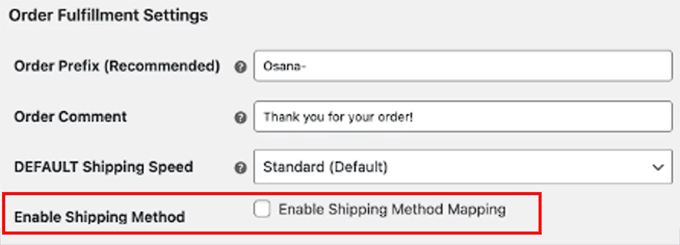
Once that is done, I suggest you add an ‘Order Prefix’ under the Order Fulfillment Settings.
It is a small label that will be added to Amazon-fulfilled orders in your dashboard. For example, you can use something like fba to make those orders easy to identify.
You can also customize the Order Comment (for example, “Thank you for your order!”) and set a default shipping speed.
This default is used when a specific shipping method isn’t matched during checkout.
After that, make sure to check the ‘Enable Shipping Method Mapping’ box. This step is really important because it connects the shipping options in your WooCommerce store to the actual shipping speeds Amazon offers, like Standard, Expedited, or Priority.
By turning this on, you’re telling the plugin to match the options your customers see at checkout with the correct delivery methods on Amazon’s side.
Finally, click the ‘Save Changes’ button to apply all your settings.
Set Up Amazon Shipping
Now it’s time to configure Amazon shipping as a method within your WooCommerce store. This step ensures your customers can choose a shipping speed, and Amazon will know exactly how to fulfill it.
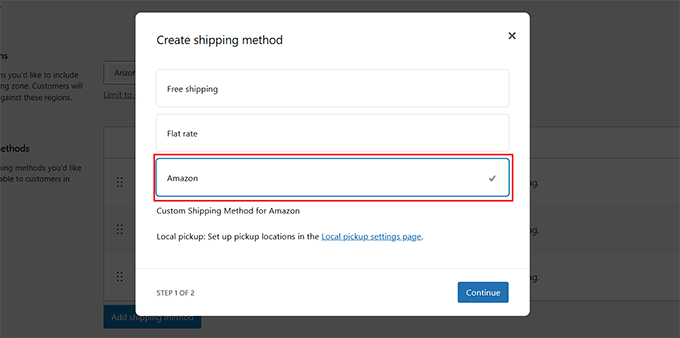
For this, head over to the Shipping tab on the WooCommerce Settings page, and either edit an existing shipping zone or create a new one.
Once you do that, click the ‘Add Shipping Method’ button.

This will open a popup, where you have to select ‘Amazon’ as the shipping method.
Then, click the ‘Continue’ button.
You’ll now see options to enable Standard, Expedited, and Priority shipping. Just check the boxes next to the ones you want to offer at checkout.
For each shipping speed, you can apply a price adjustment, either as a fixed amount or a percentage. This gives you control over how much you want to charge customers based on the shipping method they select.
For example, you could offer Standard shipping for free, charge a small fee for Expedited, and set a premium for Priority delivery — depending on what works for your pricing strategy.
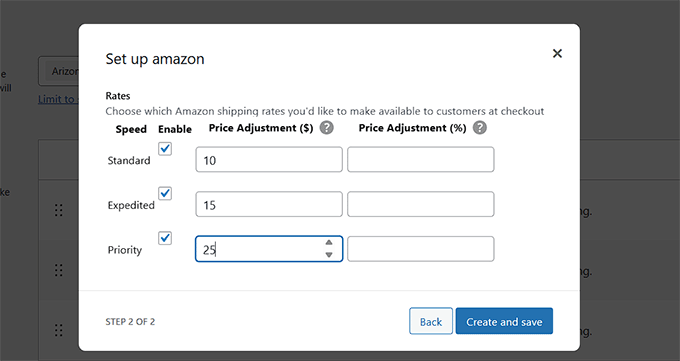
Once you’re happy with the settings, click the ‘Create and save’ button to activate Amazon shipping on your site.
🛒 Step 5: Enable Amazon FBA for Each WooCommerce Product
Now that the plugin is connected and your shipping settings are in place, the final step is to enable FBA for each product you want Amazon to fulfill.
To do this, visit your Products » All Products page and click the ‘Edit’ link for a product that you have already added to your Amazon inventory earlier.
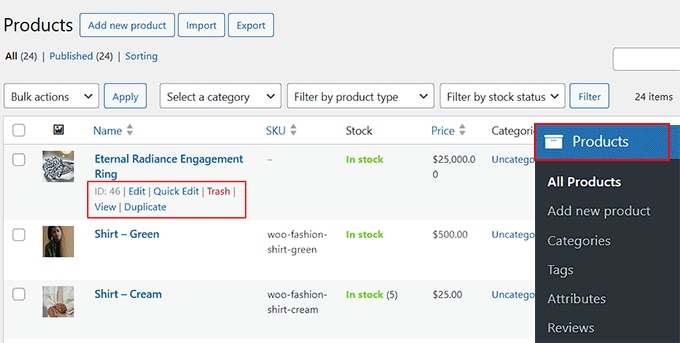
This will open the product editor, where you have to scroll down to the ‘Product Data’ section and look for the ‘Amazon Fulfillment’ tab.
There, you’ll see a checkbox labeled ‘Fulfill with Amazon FBA’ — go ahead and tick that box.
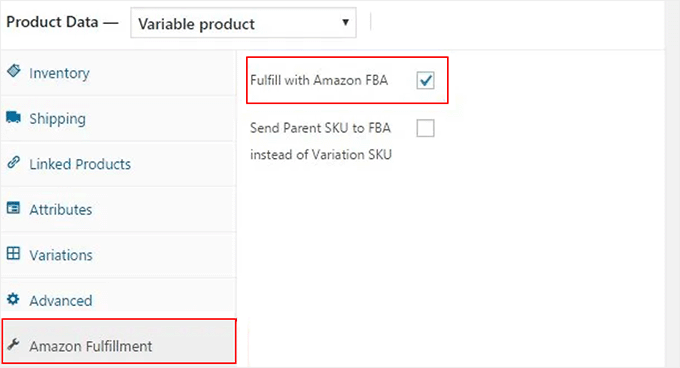
Once selected, click the ‘Update’ button to save your changes.
Now, repeat this process for each product you want Amazon to ship. Just make sure that the SKU in WooCommerce matches the SKU in your FBA inventory. If they don’t match, the order fulfillment will fail, or the sync won’t work properly.
Your products are now ready to be automatically fulfilled by Amazon whenever someone places an order in your WooCommerce store.
🎁 Bonus: Improve Customer Satisfaction with Shipping Discounts
While connecting Amazon FBA to your WooCommerce store can significantly improve your shipping times, you can add even more value to your customers by offering attractive shipping discounts.
Providing discounts encourages repeat purchases and improves customer loyalty. Plus, this is easy to set up with the Advanced Coupons plugin.
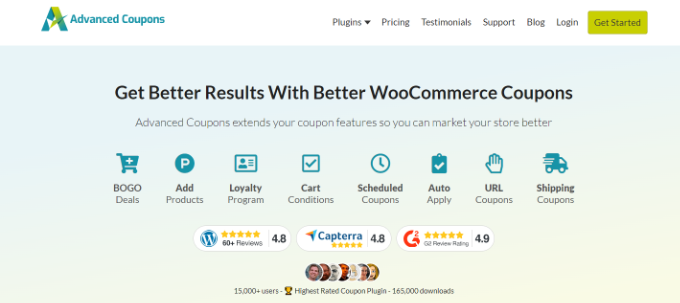
Advanced Coupons allows you to create fixed discounts, percentage discounts, or even offer free shipping based on specific conditions. Plus, you can auto-apply coupons, schedule them for sales events, and manage everything directly from WordPress.
To follow along step-by-step, you can read our article on how to offer a shipping discount in WooCommerce.
Frequently Asked Questions About Amazon FBA
Here are some of the questions I’m frequently asked about connecting Amazon FBA with WooCommerce:
What Is the Difference Between Amazon FBA and Amazon MCF?
Fulfillment by Amazon (FBA) is the service for storing, packing, and shipping products sold on Amazon. On the other hand, Multi-Channel Fulfillment (MCF) is a service that uses this same Amazon infrastructure to fulfill orders from other sales channels, such as a WooCommerce store.
Can I use Amazon FBA to fulfill only some of my WooCommerce products?
Yes, absolutely. You have full control on a per-product basis.
To enable fulfillment for a specific item, you’ll simply check the ‘Fulfill with Amazon FBA’ box in that product’s settings within your WooCommerce dashboard, as shown in Step 5.
Do I need a Professional Amazon Seller account to connect with WooCommerce?
Yes, you must have a Professional Amazon Seller Central account to use MCF (Multi-Channel Fulfillment) and connect it with WooCommerce. Individual seller accounts are not supported for API integrations like this.
Will WooCommerce automatically update inventory levels from Amazon?
Yes, if inventory sync is enabled in the plugin settings, then stock levels in WooCommerce will be automatically updated based on your Amazon FBA inventory. This helps avoid overselling out-of-stock products.
Does Amazon handle returns for WooCommerce orders?
Amazon does offer return handling for MCF orders, but it depends on your fulfillment settings and region. You’ll need to enable return management in your Amazon Seller Central account and review their return policies for non-Amazon sales.
How much does it cost to ship orders with Amazon MCF?
Amazon charges fulfillment fees for every order it ships through MCF. These fees are based on the product’s size, weight, and the shipping speed selected (Standard, Expedited, Priority). You should review the current Amazon MCF pricing on their website to understand the costs for your specific products.
I hope this article helped you learn how to easily connect Amazon FBA to WooCommerce. You may also like to see our beginner’s guide on building an Amazon affiliate store using WordPress and our tutorial on how to upsell products in WooCommerce.
If you liked this article, then please subscribe to our YouTube Channel for WordPress video tutorials. You can also find us on Twitter and Facebook.
The post How to Connect Amazon FBA (MCF) to WooCommerce first appeared on WPBeginner.
Many WooCommerce store owners face the same challenge. They love running their own online stores but find it hard to match the fast, reliable shipping that Amazon customers now expect. That’s where Amazon Multi-Channel Fulfillment (MCF) comes in. It allows you to use Amazon’s fulfillment… Read More »
The post How to Connect Amazon FBA (MCF) to WooCommerce first appeared on WPBeginner.
